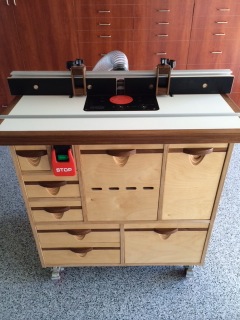
In this week’s installment of Your Home from Scratch, we’re showing off Bobbi’s beautiful router table. It’s perfect timing since we just released our own set of free router table plans, although my table isn’t even in the same ballpark as Bobbi’s.
Bobbi is one of our newsletter subscribers and I was excited when she offered to share her finished project. As part of this series, I asked Bobbi a bunch of questions about her table and her answers are below.
1. What material did you use to build the router table?
The cabinet is 3/4” Baltic Birch plywood, the drawers are 1/2” Baltic Birch plywood, the top is 1-1/2” thick with a laminate on the top and bottom and edge banded in walnut and the drawer pulls are walnut.
2. Did you work from a set of plans?
I took the Routers and Router Table class at Cerritos College (http://cms.cerritos.edu/woodworking/) and this was the design from the teacher. We did work from his plans and instructions.
3. How long did it take you to complete?
This was an 18 week class, meeting for four hours twice a week. We would usually have an hour lecture/demonstration and then work on our tables. At the end of the 18 weeks everyone had a completed router table.
4. What was the finishing process like, did you use polyurethane?
I chose to put a clear Shellac finish on my table, but most of the other students just left their’s raw wood.
5. How in the world did you make those drawer/door fronts and handles?
Ok, aren’t those drawer pulls just too cool? I was so excited to get to make them. Our instructor had four different jigs (the Jig & Fixtures class is another super great class at Cerritos College) that we used to make them. Without pictures of the jigs, I could never begin to explain how we did it. But, we used one jig with the oscillating spindle sander to make the finger pull in the plywood front and three different jigs at a router table to make the pulls. It was surprisingly easy and fun. Sorry, I can’t explain the process.
6. Have you had a chance to use it for any projects yet? What home projects are you planning on using it for?
I’ve used the table many times and I get so excited every time I need to use it. I made nightstands that required a lot of router work. My next project is to remake some mirror closet doors.
7. Can anyone build a table like this or do you think the skills you needed were fairly advanced?
We had all levels of woodworkers in our class and everyone came out with a very nice router table. I do think if someone was just given the plans to build on their own in their own shop they would probably need to be a fairly advanced woodworker.
Thanks to Bobbi for sharing this awesome router table. If you have a home improvement or DIY project you’d like to share with our readers, just shoot me an email: John at ourhomefromscratch dot com.