
In this post you’ll learn:
– How to use a thickness planer
– Why you should consider using one
– The difference between rough cut lumber and S4S
Back in 2005 when I was building my first set of kitchen cabinets, I made an impulsive purchase and bought a used thickness planer I found on Craigslist. I had heard from numerous carpenters in online forums that by purchasing rough stock instead of the ready-to-use wood from the big hardware store, I would save a lot of money. It ended up working out in my favor. When the cabinets were finally completed and installed, I estimated I probably spent around $2k-$3k for all of the lumber and hardware for the kitchen cabinets. That number may have been a few hundred dollars higher if I bought all of my lumber from Lowes or Home Depot.
The key to saving that money was the thickness planer. Without it, I would’ve had to purchase more expensive and often lower quality lumber.
Here’s a video I just put together where I explain the basics of using a thickness planer. If you’ve never used one or frankly, have never even heard of a thickness planer, then it’s worth a quick watch. It could potentially save you money on your next carpentry project.
An Introduction to the Thickness Planer
Link to the video is also here.
Key Takeaways
– Thickness planers can cut wood either on the face side or on an edge of a board
– S4S means Sanded Four Sides and is the finished wood available for purchase at most large home improvement stores
– Rough cut lumber is generally cheaper per board foot compared to S4S lumber
– S4S is more expensive and can also contain major imperfections like bows or curves
– Boards you plan on planing should initially be cut wider or thicker than the finished width or thickness desired
– Plan on running a board through the planer 3 or 4 times.
– You can adjust the amount of material being removed in each pass with an adjustment knob
– I use the DeWalt Model 734 (affiliate) and it’s on my Tool Recommendations page
Here’s a picture that illustrates the point further.
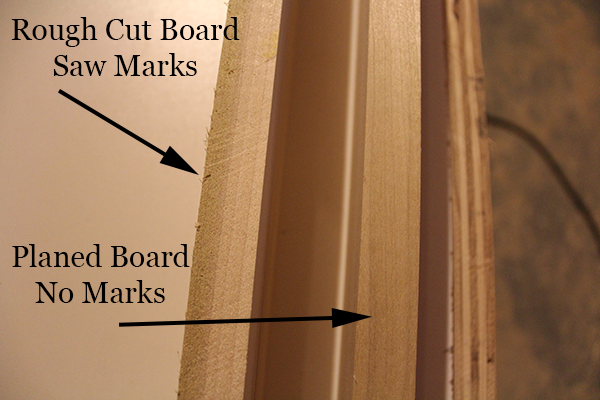
The board on the left has just been cut with a table saw and has a fair amount of imperfections including raised, uneven surfaces and saw marks. It would take a LOT of sanding or hand planing to clean that edge up OR a few passes through the thickness planer. The board on the right has just finished a few passes through the thickness planer and it looks clean and perfect.
Here’s the bottom line. If you are seriously getting into wood working and have some larger projects coming up or plan on working with reclaimed wood, then consider purchasing a thickness planer. If you are mainly into smaller projects and are just an occasional woodworker, then you’ll probably survive without one.
Any questions?


