Welcome back to our custom media cabinet series! If you’ve been following along, so far we’ve unveiled our concept design and dimensioned the face frames. In today’s post, we’re going to design and dimension the cabinet box portion of the media cabinet. We’re nearly done this drawing and dimensioning phase of the project and I apologize if it’s a bit boring. Believe me, no one wants to fire up the power tools more than me, but showing the whole process from start to finish should be extremely helpful if you’re thinking about making your own furniture down the road.
Here’s another look at our media cabinet with the major components labelled.
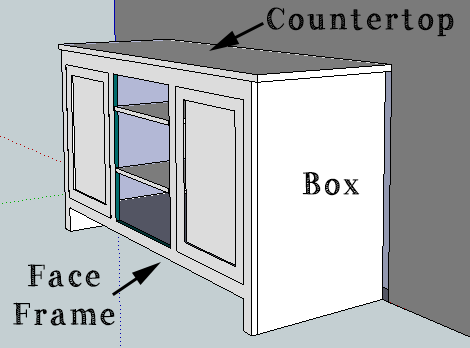
In our last post, we mentioned that the face frame is only 3/4″ thick and attaches to the plywood box. All of the box components will be made from plywood for a few reasons.
– It’s the least expensive option. You could use solid hardwood, but you’ll pay big bucks for pieces this wide. An entire 4 foot x 8 foot sheet of plywood will only set you back $40 or $50.
– It’s dimensionally stable. It won’t expand or contract too much throughout the changing seasons nor will it cup or warp like solid wood.
– It’s very strong.
The big draw back to using plywood for any project though is its edge. Plywood is a laminated product and you can see all of those layers if you look at the side of it. Part of the challenge to furniture building with plywood is hiding those edges. In this case, all of the plywood edges will be either hidden behind the face frame or will be against the wall, floor or countertop.
Let’s do some design and dimensioning of our cabinet box.
Here’s a side view of our media cabinet.
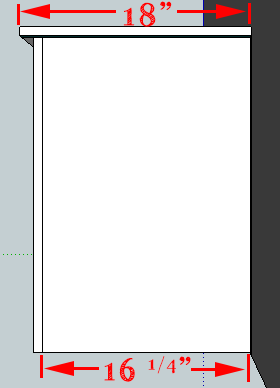
After we subtract the countertop overhang and the face frame, the remaining width of the cabinet sides are 16 1/4″. The length is just the 27″ height minus the 3/4″ thickness of the countertop, leaving 26 1/4″.
Here’s a solo shot of one of the cabinet sides.
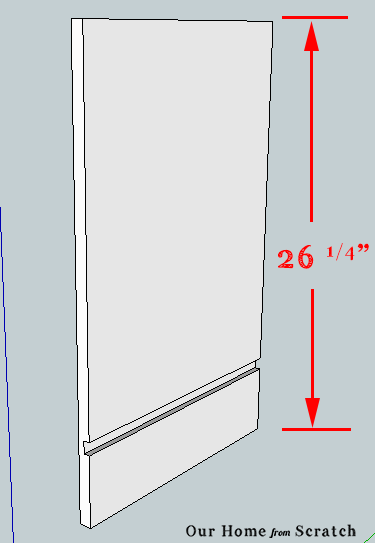
In this image you can see a groove I’ve added across the width of the side piece. That groove is where the cabinet bottom will intersect the sides. I’m going to get more into that whole process later on in our tutorial, but for now, all you need to know is that the groove is 3/4″ wide, 3/8″ deep and it runs the entire width of the side.
Here’s what the bottom piece looks like plugged into the groove in both side pieces.

The bottom piece has the same 16 1/4″ width as the side pieces, but clearly is much longer. The length is 46 3/4″. I calculated that length with some simple math. I started with the countertop length of 50″ then just subtracted out the overhang, the extra 1/4″ from each side of the face frame and then the depth of the grooves in the side pieces.
One of the most important things to take away from this design process is how to figure out your design’s dimensions. It’s all just a matter of book keeping. Don’t be intimidated by it if it’s not making too much sense yet. I’ll save the rest of the dimensions for the next post.
For added support, I’ve included a piece of plywood strapping across the back of the box. I could’ve used a solid plywood backing board instead of just a strip, but since this stand isn’t going to see a ton of weight, I figure a strip of wood oughta do it.
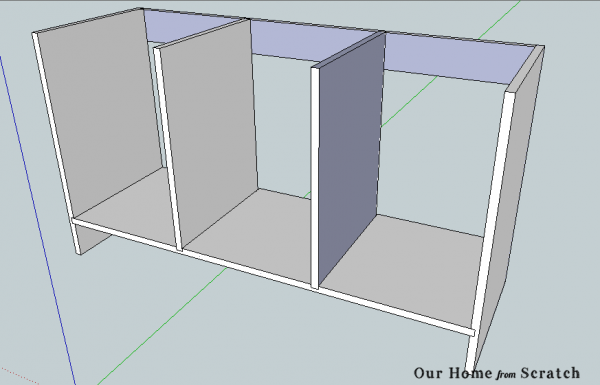
You may also notice that the bottom piece has two grooves. Those groves are where two dividers will be located.
Here’s what the cabinet box will look like assembled with the dividers…
Now our media cabinet is almost completely designed. Next up, we’ll transfer our dimensions that we got from our design phase and make some cut sheets and shopping lists.
What about the doors and the countertop? Well, the countertop design I’m not showing since it’s just a piece of 3/4″ thick plywood with some edge banding. The dimensions are 50″ x 18″. The doors I’m going to fit into the face frame once it’s built rather than try to build those from a drawing. I think I’ll get a better fit that way. Same goes for the shelves. You’ll see.
Any questions so far?


