In this post you’ll learn:
-What Detailed Design is all about
-How to use existing products to dimension your own projects
It’s been nearly two weeks since our last home office post, so it’s time for an update. We just completed the detailed design work and we’re going to be getting started later this week with the actual building. I’m pretty pumped about starting. Really looking forward to building some coffered ceilings and cabinets!
Let’s do a quick recap of where we are in the build process. Nearly a month ago we kicked off the room re-design with a discussion on the Home Remodeling Process. We started with the Concept Design stage where we listed all of our requirements for the space and made some rough designs of built-in and cabinet options using SketchUp. We finished the Concept Design stage with a couple major accomplishments: 1.) We picked a furniture layout and 2.) We picked a coffered ceiling design. That’s it. That’s all we really needed to do there.
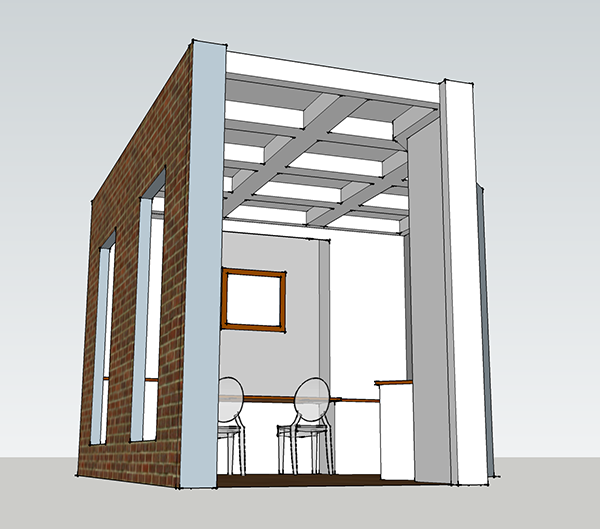
Here’s a quick picture of where we left off last time…
So now it’s time for some Detailed Design work. What’s involved with the detailed design work? Good question. We’re going to take those rough ideas we came up with during the Concept Design stage and we’re going to add all the detail. Were you expecting something else?
What sort of detail? That’s a better question. Here’s a list of everything I need to have answered before I’m done with the detailed design work and can start buying material.
1. Large built-in cabinet dimensions: How wide to make the stiles and rails. Length of all the cabinet pieces. Door or face frame designs. How high to make the cabinet. How high to tie it into the coffered ceiling. What sort of cabinet construction method. Cut sheets. Material list. If drawers, which drawer slides, etc.
2. Coffered ceiling: How will I actually build this thing. How much lumber. Where will the lights go. How many lights. What size/design crown molding.
3. Work desk: How much space will we need. What sort of leg room. What color to make the desks.
4. Filing Cabinet: How big should the drawers be. What kind of drawer hardware. How big are filing cabinet folders.
Get the idea? I need to nail down the specifics of nearly everything that gets assembled. That means I need to think about all that stuff and in my head or on paper I need to know the process or the steps I’m going to take to get the room finished. Admittedly, that’s not something I can explain in great detail in a couple posts. It takes a LOT of experience to design a functional cabinet from start to finish and then tie it into a desk and ceiling work. Is it hard to figure all that out? Not really and it’s fairly easy stuff to learn, just time consuming.
The key point I’d like to stress here is that if you aren’t prepared for even one build detail, it can bite you. If I just winged the coffered ceiling or the cabinets, I may get lucky and end up with a quality piece of work, but chances are I’d make mistakes or end up re-doing something. Putting all these details down on paper is really the goal here.
So let’s dive in a little deeper here so I can illustrate how I wound up with the details for each of these main four areas.
Dimensioning the Cabinets
Let’s start with the built-in design. First thing I did once I nailed down the overall dimensions, which includes the height, width and depth of the cabinets, I went to work on figuring out how big to make each individual piece. I used the SketchUp model I started with and drew some lines and rectangles on the face of the cabinet until I had something that looked like a cabinet. I stuck with common dimensions for all the parts. So, the rails and stiles are all 2″ or 2.5″. I didn’t intentionally make something 2-17/32″ or something. Keep it simple. Here’s what the front of the bottom built-in cabinet looks like with the drawer front drawn on and the doors.
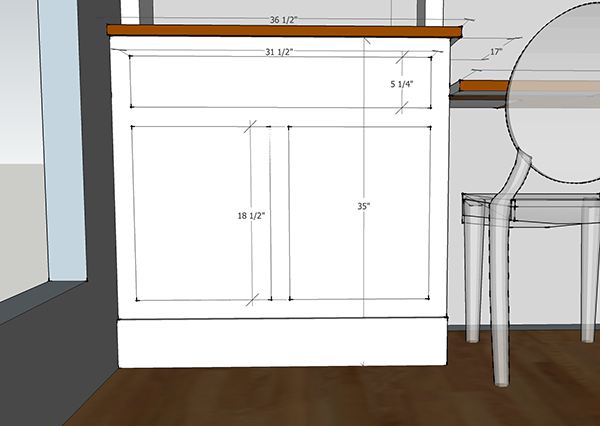
You don’t need to be a SketchUp expert to come up with something like this. If you want more info on how to dimension a cabinet, I suggest you read our series on our Custom TV stand.
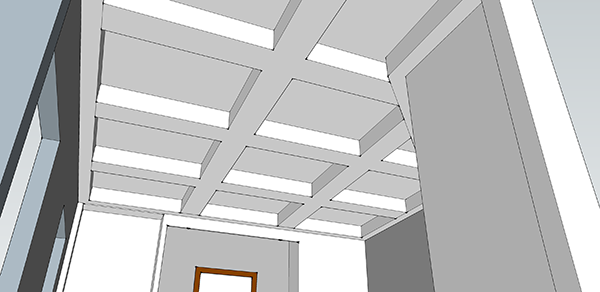
Now let’s talk about the coffered ceiling. The original design included three drywall boxes across the width of the room and four across the length. I assumed the drywall should be 8″ wide, just because I thought it looked good. Then I got to thinking about how I was going to actually construct these coffered ceiling beams and I realized that my initial layout was flawed and that maybe getting 8″ wasn’t quite as plug and play as I’d like it. So, I made some changes. I came up with a layout that worked for the room, but more importantly, it’s something I can make from regular 2x’s and some drywall. I ended up with 3 boxes across by 3 the other way. It’s slightly more rectangular than I’d like, but it’s going to be much faster to build.
Here’s the original ceiling layout:
Here’s the current one:
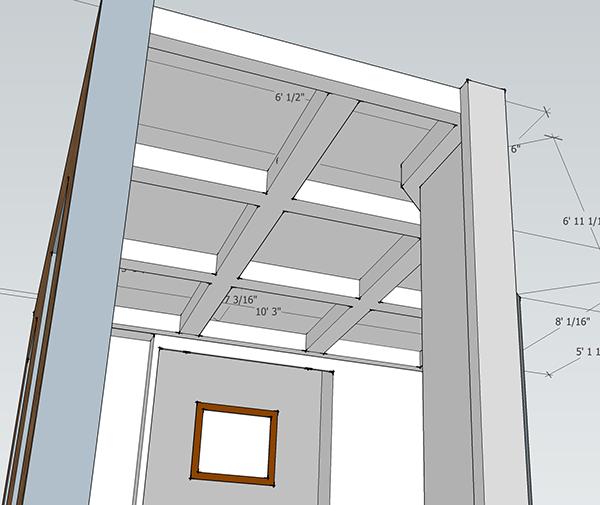
It’s not a huge change, but the top one would take me much longer to build. I’ll get more into the details of the finished coffered ceiling design when I actually show you what the framing looks like. It’ll be much easier to explain a photo than to try to describe my idea.
Onto the work desk. When you design something simple like a desk, it’s easier to start with existing models. So, instead of reinventing the wheel, I just looked inside a Pottery Barn catalog and wrote down the dimensions of one of their desks. Their desks have a depth of 23″. Okay. So does mine… now. Better to use a reference than to guess at something like that.
As for the filing cabinet, I measured the dimensions of a folder we use in our current filing cabinet. Now when I design the drawer size for the new unit, I know it needs to accommodate a drawer that can hold one of those folders. That’s how I came up with my drawer sizes for the third cabinet.
So after all that detailed design work, my finished product is a list of materials I need to take to my local building supplier. I’m having them deliver all the long pieces, since it’s easier. I’ll pick out the poplar boards for the cabinets myself.
In our next Home Office post, we’re going to start framing out the coffered ceiling.
If you liked this post, please share it.


