Happy Friday! This weekend I’m hoping to make some major progress on our custom media cabinet. Really looking forward to getting back into the workshop. Once this cabinet is done, we’re going to finish off the decor in our sitting room, which is pretty much the entire point of these recent furniture builds.
In our last two posts, we designed and dimensioned the face frames and the cabinet box. We skipped the doors, the shelves and the countertop, but we’ll circle back to those later. Since we know the dimensions of all the pieces of hardwood and plywood we’ll need, I can make cut sheets and a shopping list. We all know what a shopping list is, but if you’re not familiar with a cut sheet, then this will be a good learning experience.
A cut sheet is a drawing of a piece of wood with each component marked off. Sound confusing? Why don’t I just show you the cut sheet I came up with for our media cabinet.
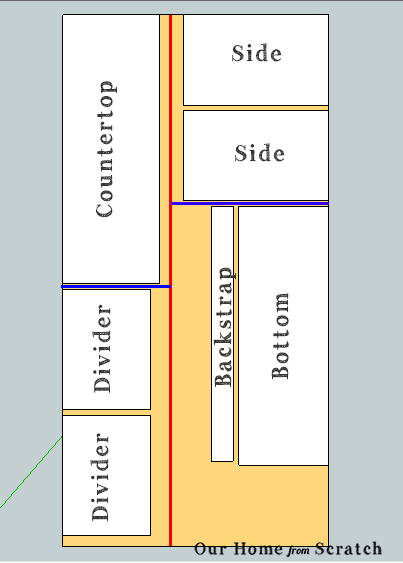
I’ve drawn a 4 foot by 8 foot rectangle, which represents a standard sheet of 3/4″ plywood. On that sheet, I’ve drawn and labeled our cabinet box parts. This then becomes a blueprint of how I’ll cut out each part.
There are several advantages to making a cut sheet. It takes the guess work out of how many sheets of plywood you’ll need. It allows you to maximize each sheet so you end up with as little waste material as possible and it gives you a blueprint you can use in the workshop.
So you can see from the cut sheet above that I can fit all my plywood box parts on one 4×8 sheet of plywood. I’m also not including any of my shelves here or any of the door parts. I’ll probably make the shelves last with some scrap plywood I have laying around.
What are the red and blue lines?
We don’t have a truck or a big SUV anymore, so I can only fit smaller pieces of lumber in our family car. I need to have the hardware store cut down the plywood to a more manageable size. The red line is where I’ll have the store make the first cut on their panel saw, which breaks down the plywood into two pieces. Then I’ll have them cut along the blue lines to make the pieces even smaller. Doing this ahead of time saves me from having to figure it out when I’m there at the store.
That’s just the plywood. You can also make cut sheets for pieces of hardwood. Here are the cut sheets for the face frame…
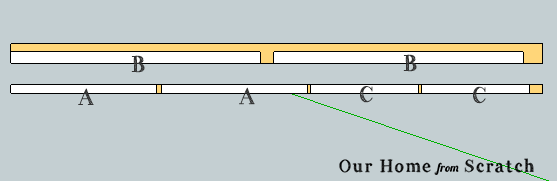
The top board is a 1×4 and the bottom is a 1×2. The letters are the same letters I used in our face frame post. So, from here we can see that I only need to buy two boards for the face frame. I’ll also need a couple more boards for the doors, but you get the idea.
Cutsheets are where it’s at.
Next up, we take you shopping.
Any questions?


