Believe it or not, it’s been about seven months since we started our home office remodel and we still have a good amount of work left to do. While we never intended for it to take this long, life has a way of stretching some things out. Since we starting our office project back in December, we’ve since gained a good amount of new readers and newsletter subscribers, so I thought it would be helpful if I did a mid-way thru recap post so everyone can see what we’ve done to date and what we have left to accomplish.
1. We kicked off the office remodel with a post and a video on removing old hardwood floors and installing new ones.
2. Next we made a video on how to use Sketchup for designing basic room layouts and we showed you our future office layout.
3. We switched gears for a bit and discussed the coffered ceiling concept design and then settled on the final detailed design for both the ceiling and the built-in cabinets.
4. With the room planned, the coffered ceiling framing was installed, wired for the lights and then finally drywalled.
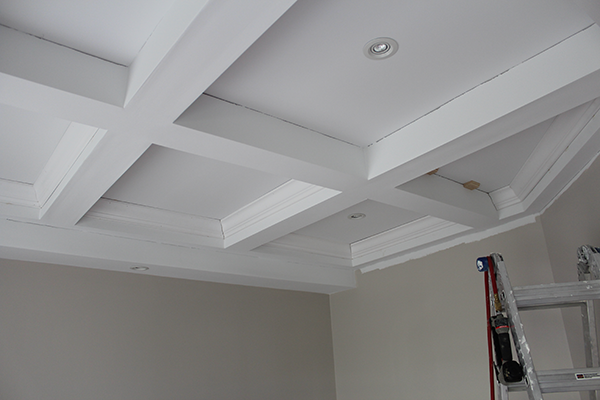
5. After the ceiling was primed and painted, I got around to installing the old work style recessed lights.
If you check out this list of posts, you’ll be all caught up on our home office remodel.
Right now I’m in the middle of installing the crown molding. It’s a giant pain in the rear. Each coffered ceiling box gets crown molding and then the entire perimeter of the room will get it too. This isn’t the first time I’ve installed crown molding and I have managed to learn a few tips and tricks along the way. In our next post, I plan on sharing a video where I’ll share what I’ve learned. There are a few things you can do to make the job much easier. It still stinks though, got to be honest with you.
So here’s what coming soon to a post near you:
1. Crown molding installation video with tips for better results
2. Cabinet construction. (I probably won’t go quite as in detail as our last cabinet series, but you can expect more videos)
3. Building a filing cabinet from scratch.
4. Building a simple desk. (I’ll share a trick I learned to make thin wood look super chunky)
5. Baseboard molding and finishing touches.
6. Dressing up the room. There will be Doctor Who themed decor items. Plan on it.
Thanks for reading! If there’s ANY part of this office remodel project you’d like more info on, please don’t hesitate to ask. I’m happy to share details or answer questions.
Have a great week!


